![]()
Opigno LMS User manual
Installation
- Opigno LMS
Opigno can be installed on top of an existing Drupal website.
Nevertheless, it is more simple and we advise to install it as a Drupal distribution, which means from scratch, without a pre-existing Drupal website. To do that, you have to download Opigno LMS distribution from our website at: https://www.opigno.org/fr/download
The installation process is in this case similar to the one for a normal Drupal website, as explained here: https://www.drupal.org/docs/7/install
The installation process is very similar to a Drupal installation, since Opigno has been packaged as a Drupal distribution. You just need to create a MySQL (or equivalent like MariaDB) database, install the required PHP libraries (for example PDO), download the Opigno distribution either from our website or from Drupal project page, extract it into a folder accessible to your web server, and type in your favorite browser the URL linked to this folder. Then follow the different steps. In case of missing dependency or incorrect configuration of your web server you will get warning messages indicating you how to proceed.
Important notes regarding performance
- For the installation, and for an optimal performance, Opigno requires at least 256Mo memory for PHP (ideally 512Mo). This can be defined on a Debian server by editing the file /etc/php5/apache2/php.ini and by changing the value of the line memory_limit, for example to have it like this: memory_limit = 512M
We also recommend having this value in php.ini in order to avoid problems during the installation: xdebug.max_nesting_level = 200
Then, don't forget to restart the Apache service (service apache2 restart on Debian servers) to have the modifications taken into account.
once Opigno is installed, don't forget to add a CRON task, which will highly improve the performance of your Opigno platform. You can find the URL to be called in the menu Report -> Status report (or by visiting the page http://your.domain.tld/admin/reports/status). The CRON task should then be defined as:
0 * * * * wget -O - -q -t 1 http://url.to.be.called
if you want an hourly CRON and where url.to.be.called is the URL displayed in the Status report page.To add a new CRON task on a Debian server, simply type in a terminal crontab -e then paste the instruction above, replace the url, save, and then restart the cron daemon with /etc/init.d/cron restart
On a dedicated server, fine-tuning your MySQL settings can also highly improve Opigno performance. This can be done on a Debian server by editing the file /etc/mysql/my.cnf
You can in particular have a look at :innodb_buffer_pool_size #(you can define for example 25% to 50% of your total RAM) innodb_log_buffer_size #(you can for example use 256M) innodb_thread_concurrency #(you can try for example 24 or 48) innodb_flush_method #(we advise the O_DIRECT value)
PDF certificates generation
Opigno offers the possibility of creating certificates and awarding them given certain lesson requisites. By default Opigno ships with the PDF generator dompdf. Despite it being functional, we recommend the installation of wkhtmltopdf.
You will first have to make sure that the "wkhtmltopdf library handler" module is enabled on your Opigno instance, and if not enable it (you can do that in the module management interface, at /admin/modules). Then, on the server side, you will have to follow the following steps (the syntax thereafter is for Debian Jessie or Stretch):
Install wkhtmltopdf :
apt-get install wkhtmltopdf
Note: If you don't use Debian, you can download it from : http://wkhtmltopdf.org/
Then, extract it and move it to /usr/bin/, and rename it to wkhtmltopdf so that now you have an executable at /usr/bin/wkhtmltopdf, and set permissions: chmod a+x /usr/bin/wkhtmltopdfInstall required support packages:
apt-get install openssl build-essential xorg libssl-dev
Check to see if it works, run:
If it works, then you are done – make sure to make a symbolic link as per number 7. If you get the error "Cannot connect to X server" then continue to number 4.wkhtmltopdf http://www.google.com test.pdf
We need to run it headless on a 'virtual' x server. We will do this with a package called xvfb.
apt-get install xvfb
We need to write a little shell script to wrap wkhtmltopdf in xvfb. Make a file called wkhtmltopdf.sh and add the following:
xvfb-run -a -s "-screen 0 640x480x16" wkhtmltopdf $*
Move this shell script to /usr/bin, and set permissions:
chmod a+x /usr/bin/wkhtmltopdf.sh
Finally, make your symbolic link in /sites/all/libraries/wkhtmltopdf. Command is:
cd /sites/all/libraries/
ln -s /usr/bin/wkhtmltopdf.sh wkhtmltopdf
Then you can change the PDF generator to be used, at Configuration -> User Interface -> Printer, email and PDF versions -> PDF, and choosing wkhtmltopdf.
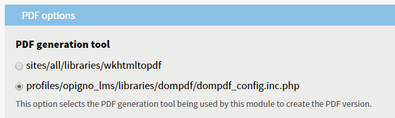
This interface also makes possible to set the settings for the wkhtmltopdf options. These options can be found at:
http://madalgo.au.dk/~jakobt/wkhtmltoxdoc/wkhtmltopdf_0.10.0_rc2-doc.html
Related content
Copyright 2008-2024 Connect-i. All Rights Reserved - https://www.opigno.org