...
This can be done by clicking on the "Add a new training" button at the top of the training catalogue interface.
 Image Removed
 Image Added
| Tip |
|---|
| Anchor |
|---|
| training-creation-process |
|---|
| training-creation-process |
|---|
|
The whole process is guided step by step to make sure that you will have a fully operational training when reaching the end of the process:You can see these different steps within the panel on the left side of the interface, that allows to navigate between all of them: 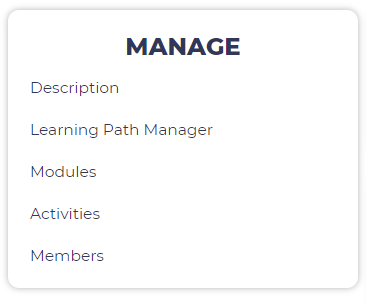
There are 6 different steps: - Description: this is where you can define the main characteristics of your training (name, description, category, required time, ...), set the visibility settings, and unpublish the training (once it is created). You can learn more below about the available options in this interface.
- Learning path Manager: this is where you will define the architecture of the training (the main steps composing it). This will be explained in details in the next section of this documentation (Learning path manager). In case you want to learn more about Opigno's architecture of contents, you can also refer to that part of the documentation.
- Modules: this is where you will be able to add modules to the courses available in your training. In case your training doesn't contain any course, this step will simply be skipped. You will learn more about this process in that section.
- Activities: this is where you will be able to manage the activities in your modules. You can learn more at the dedicated section of this documentation.
- Members: at this last step you will be able to enroll new learners to your training, and manage the enrolled users when editing afterwards the training. This will be covered more in detail in the dedicated section of this documentation.
|
...